Thursday, April 26, 2012

Paint Brush Cleaning 101


In the past I have been the biggest idiot...or just lazy bones...about cleaning my paint brushes. I ruined several by not cleaning them correctly. Ultimately, I either had to buy another one or it made the next job I did much harder with a messed up brush.

How hard can this be? Well...it's not at all hard as long as you do it and I have a few tips that will help you to do it in such a way that your paint brush will seem as good as new when you do the next project.

If you are dealing with any water-based product or your typical latex paint you are going to have a pretty easy go of it. It cleans up pretty nicely with soap and water. Seems idiot proof (and it is) but there are a couple of things to keep in mind to make it easier on yourself.

Rule #1: Clean the brush IMMEDIATELY after you finish your project.

Don't leave the paint brush for a bit and then try and clean it. Clean it right away. Paint dries at different rates depending on a few factors, but the important thing is that you don't want the paint to dry and then be permanently crusted. Best way to avoid that is to wash it right away.

"Can't I just use paint thinner later?"

Yeah, probably, but I try to avoid it due to its toxicity and the extra work I would have to do later. Just do it right away and you won't even have to fight with it.

Rule #2: Follow the instructions for clean up on the product you are using.

These companies are really nice and try to make it easier on you. If they tell you to use something other than soap and water to clean your brush there is a reason. If you clean something oil-based with water you wont actually clean it correctly and you will run the risk of ruining your brush. They are giving you good advice, so my suggestion is to follow it, so don't be a lazy bones!


Water-Based

1. Rinse it out with water in the sink or with a hose. 

2. Add a small amount of soap and work it in with your fingers, fan the brush out to help get the bristles clean in the center. You want to focus on more than just the outside part of the brush. 

3. Rinse again and use your fingers to squeeze the water and paint out of the brush. Do that several times. 

This whole process should take less than 5 minutes if you do it right away. 

Oil-Based*

1. It will probably tell you to use paint thinner of mineral spirits, so put some in an old soup can, bucket or old coffee mug and let the brush sit in it for 15 minutes or so.

2. Rinse under water in the sink or with a hose. 

3. Use an old towel or t-shirt to wipe the brush. 

*Per contractor I know. 


Rule #3: Get the excess water out of the brush for quicker drying time.

There are a couple of ways you can do this:

A) Use all the might in your arm to shake it out. Hold the handle and act like you are going to throw it on the ground as hard as possible, but don't actually throw it. The water will fly off the brush. Do that several times.

B) Hit it back and forth against a dry tree, brick, piece of wood, etc.

Either way you will get the water out and it dries pretty quickly. This is especially helpful for avoiding a large water puddle underneath the brush or if you have to use it for a different project soon after.

Go forth and have clean, usable brushes!

Friday, April 20, 2012

DIY Chalkboard Menu for under $10!!!

So if you have kids or a spouse who is always asking what's on the menu for Breakfast, Lunch or Dinner you can do something like this. My husband's most common question in the house is "What's for Dinner?" I answer this question daily. So to save us both some time I decided to make a Menu board I can put in the kitchen to answer this never-ending inquiry. Of course this must be done On the Cheap or it's not worth doing...am I right, people? Yes...I am. 

Now you may be asking, "How is it faster to take the time to write it down than just answer the question?" Truthfully it might not be, but if I get in the habit now, when my kids are older and able to answer the question, I wont have to answer it multiple times for multiple people. 

Another reason I'm doing this is because I tend to get lazy on the quality of food I eat especially at lunch. I figured if I wrote down what I was going to eat for lunch that day instead of figuring it out when I was starving, I would be more likely to stick to a healthy meal than run out and get something not as good for me. Look at is writing down a daily goal. Anything to help me live a healthier lifestyle. Don't worry

So I went to the local Walmart (although not my favorite place, it is a cost effective place) and I purchased an 11 x 14" picture frame with a cool design I liked for $5. I might have been able to find something cheaper at Goodwill, but I may have had to repair it or spray paint it, so I opted for a new Walmart one. I also purchased this can of Krylon Chalkboard paint for $3.97. 

Total project cost: about $9


Step One: Remove glass and find a surface you can easily spray paint on that is well ventilated. Spray in even horizontal strokes. If you stay in one place too long it could create excess paint spots or drips which you don't want to have to fix later. 


Step 2: Wait for it to dry a couple of hours and then verify that you have enough of a coating on it so you have an even surface to write on. If you missed a couple spots, just add to it again using the same instructions in Step 1. 


It should look like this when it's finished and dry.


Step 3: Put the glass back in the frame, hang on the wall and enjoy! 

You can use this for anything, not just a menu...maybe a calendar reminder, to do list, or whatever fits your needs. 

Also, note that you do not have to use glass or a picture frame for this type of project. You can use plastic, wood, metal, etc. to spray on. The beauty of this chalkboard paint is that it adheres to almost ANY possible surface. I just chose this method for the aesthetic quality and I wanted to make sure I had a hard enough surface to write on with the chalk. 

I did not primer the glass before painting and I tested the wet chalk and it did not remove any of the chalkboard surface. Luckily if I have any problems down the road (which I doubt I will) I have the rest of the can to re-spray if needed or to just make another chalkboard...maybe for my daughter's play room. Oh the possibilities!

Tuesday, April 17, 2012

DIY Painted & Weathered Wall Hanging

Here is a tutorial on how to make a weathered wall hanging. You can use any color you choose really and you can use it for whatever the heck you want!


I'm not totally finished with it, so it looks plain. I will update later when I finally finish it.

Monday, April 16, 2012

Adding Stenciling to IKEA Bookcase

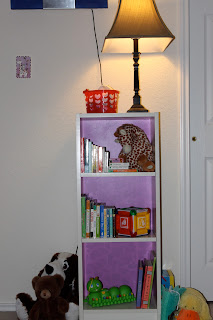
I had an inexpensive white IKEA BILLY Bookcase. Currently it costs $25 and is just a simple, short, 3 shelfer. Since I've put it in Dylan's room with her brown furniture I've been feeling like I needed to make it more a part of the flow of the room. It stands out so much I just had to do SOMETHING with it. Dylan has the Cocalo Jacana crib bedding set. So I decided to take the purple color out of it and stencil something on the backing of the bookshelf. 


Cocalo Jacana

So I want to make sure I could remove the nails from the backing and slide it out of the bookshelf BEFORE I went and bought everything. Then, I went to the local craft store and picked up a small giraffe print stencil and purchased some Valspar paint from Lowes for a few bucks. The stencil was $3. They had a larger option with Zebra print for about $12, but I really wanted the giraffe print. So I took it home and tried to stencil using a rag for the paint and painter's tape to hold it in place. I didn't want to spend extra money on the stencil adhesive or a new brush. Well, the paint bled under the stencil without the adhesive and I didn't like the way the paint looked with the rag. Lucky for me the plastic bumpy texture of the backing allowed me to rub the dry paint right off with the rag. The unfortunate thing was I now realized if something (like a book) rubbed the backing the paint would come off. The answer? Primer, another $3 or so. 

So, now realizing just how important the spray adhesive was, I hauled myself and Dylan back to the craft store and purchased it for another $3 or so. Luckily I found a flat stencil brush I didn't even know I had up with my craft stuff so that saved me money. Other options you can use are a roller or sponge. Hopefully you have one of those things on hand. 

After using a spray primer and letting it dry, I then sprayed the stencil with the adhesive and it worked SO well and the paint didn't bleed underneath again at all. I also switched the stencil upside down back and forth so that it didn't look too uniform (a tip I had received from a Lowes YouTube video). I loved the way the giraffe print looked, what I didn't love was that the spots on the edges had flat sides so what I ended up with were two vertical lines down the middle of the backing:


I even tried using the stencil to put random spots within those vertical lines to distract from them, but I still couldn't get over how ridiculous I thought it looked. ARG! Painting over it was the only thing I could think of. I really wanted the print, but I thought solid purple would look better than plain white any day, so as disappointed as I was, that was what I decided to do. 

Common sense: If you paint another layer of the same color on top of each other it will get darker. Instead of re-primering, I was lazy and decided to just paint a layer over it. Ultimately it made the white slightly purple and the spots that were already there REALLY purple. I don't endorse laziness on DIY projects NORMALLY, but to my surprise, it paid off. It ended up giving it kind of a cool dimensional look:


I know now that you know those vertical lines are there, you still see them. Better though, right? I figured once I put it in the bookshelf you really wouldn't notice with this new look that I now thought was pretty cool lookin'! So my last step was to apply a clear matte finish to protect the paint from scratching off with a book or toy. That was something I already had so I went ahead and used it and let everything dry over night before putting it back together:


See...you can't even tell the lines were there now and I have a gorgeous new look on my bookcase. YAY! 

This wasn't that expensive of a project. I had actually purchased the paint and primer for another project we are doing so I already technically had that on hand. Here is the break down: 

Stencil: $3
Adhesive: $3

So for $6 I practically had a completely new bookshelf. 


Thursday, April 12, 2012

I Brake for Yard Sales

I have to give credit where credit is due. I've been inspired by many folks in my love for design and decor. Over the years I've gained a real appreciation for this industry and even started my Master's Degree in Interior Design which is currently on hold after becoming a Mother for the first time. That hasn't stopped me from wanting to transform everything around me over and over, so since I stay home now I need to find a way to do it and save money at the same time.

All that to say that my latest inspiration has been Lara Spencer and her new book "I Brake for Yard Sales." She is more well known for being a host on Antiques Roadshow and as a News Anchor on Good Morning America on ABC. I think that is all about to change for this extremely talented woman. I have pinned this book, facebooked it, read it, and recommended it over and over again already. I read it cover to cover in about 24 hours (a true feat if you have small children).

Enter into search bar on the right and get it for only $14.50 on Amazon!

Lara tells the story of her inspiration: her Mother, an avid yard saler who taught her how to shop for bargains, what to look for, and how to update old looking items into something fresh and new. Between her background and her sheer talent and eye for symmetry and color, Lara Spencer is truly an inspiration to those of us who want style but don't feel we can afford it.

I wasted no time in running out to the nearest Goodwill and you saw the fruit of that in my last post. Just $2 for two items that added a lot to start off the decor in my Powder Room. Thanks Lara! I also went to the local Flea Market. No luck there, but I did go on a bad day: Easter Sunday. So I'm going to go back on a better day and see if I have more luck. I also found another Goodwill, a Salvation Army, a City-wide Yard Sale, and military yard sale coming up later in the month on post.

She is all about the 3 Rs: Rescue. Recycle. Reinvent. Boy does she live that! I definitely recommend her book. The practical tips in her book will not only change your LIFE, they will also challenge you to see just how well you can do on your budgeting! I'm now in competition with myself.

TIPS FROM LARA:

I spoke with Lara recently via twitter to ask her for some tips.

AB: "What tip can you give for us military wives on a budget?" (or anyone on a budget, really)

LS: "Re-invent pieces you already own by re-painting with glossy paint. Just [don't] forget to lightly sand and use a primer!"

See what a little repainting can do? Gorgeous Green.


AB: "How about tips for rummaging through those overwhelming flea markets?"

LS: "I recommend going thru a flea market twice...you will see different things each time!"

This entire room is made up of garage sale, thrift store, and flea market finds simply 
painted and reupholstered

You can follow Lara via twitter: @LaraSpencer. She is also on Facebook. 

MY TIPS:

1. Find and join your local Freecycle Networking group online. www.freecycle.org

2. Craigslist has a "free" category. Check it out for some free pieces. Also, they have a "barter" category where you could trade something you do well for something you need. Even something like sewing skills for drapes if you don't know how to sew (yet!).

If you have never painted or even sanded a thing in your life check out her chapter "Refinishing School" in her book to get some more information. She also gives you real life examples of the many projects she has done for herself and others including the pictures shown above. MIND BLOWN.

Point is: Don't wait to order this book. It will absolutely change the way you think!


Wednesday, April 11, 2012

Glass Vase turned Colorful Decorative Piece

Many renters can relate to the fact that painting is SUCH a pain when you don't own the place. It costs you money every time you do it (if they let you do it at all) and then costs you more money to paint it back or to have the building charge you to paint it back for you. 

The solution? Use BOLD COLOR in your furniture or decor! There are easy ways to do that. Don't be shy...you a fan of electric grape right now? DO IT! You can always change it later because remember...we are doing this ON THE CHEAP! It will no longer kill your bank account to do this type of thing. 

I'm on a mission to turn my white-walled Powder Room into something more exciting. This is one of the first things I did. It took just the trip to the store, about 15 minutes project time, and about a day to dry to be safe. Total product cost: $3.96. 

REMEMBER: If you have an Active Duty Military ID you receive a 10% discount from Lowes and Home Depot. 


Here are some addition pictures: 


Vase in progress...


You can see above how plain my Powder Room looks so far. This is a start!


Another $ 0.99 Goodwill find. It actually has some of the Aqua tones in it which accents the vase really well. 


Close up of the sink with my new items. I will probably use the dish as a place guests can set their jewelry whilst washing their hands since I loathe bar soap in these types of situations. I love lavender foaming soap though! 

TIPS: 

1. Wash the vase and wipe out using a lint-free cloth or T-shirt. 

2. Be BOLD! Pick a really fun color, if you aren't sure which one to choose based on what is already in the room, use a piece of wall art to match the color. I recommend choosing a color out of it that is not the MAIN color, but a secondary or tertiary color in the piece. 

3. Be PATIENT as stated several times in the video. It wont take you more than 15 or 20 minutes to complete this but you don't want to make it harder on yourself. 

4. If paint gets on your fingers and gets on the outside, no big deal. When it dries it will come right off with your fingernail. 

5. If you get drip marks around the outside top rim, use a slightly damp paper towel to run across the rim to get some of that excess paint off. 


Tuesday, April 10, 2012

Cheap Style 101

Now let's get this straight...I don't mean "cheap" in the negative sense. This is all about making your place  look great without your wallet turning to dust before your very eyes.

I don't know about you, but being an Army wife allows me the blessing and curse of moving and setting up a new space over and over and over and...well you get it. I love to decorate so unpacking can be a lot of fun, but it can also be expensive when all of a sudden a piece of furniture doesn't work in your new space for WHATEVER reason.

MAYBE you are a serial re-designer who just can't stop yourself from reorganizing, pitching, and buying whatever inspires you in the moment. That can get expensive my friend. Take it from me...I am all of the above! I have lost so much money on changing my mind or moving. If there was a Redecorator's Anonymous I would (for damn sure) be signing up. Whatever the reason for your Design ADD, Style on the Cheap will give you tips and tricks for true inexpensive (even free at times) home makeovers. It might not be EXTREME, but take it one step at a time.

I would get excited about one Do-It-Yourself show after another on the many home makeover channels only to be ultimately disappointed when their definition of Designing on a Dime added up to a LOT of dimes that I didn't have. One show convinces the person to have a yard sale with all their junk (typically targeting varying types of hoarders for the most WOW effect at the end) and says they can redecorate with the yard sale money. I thought I had found gold with that show...that is...until they brought in truck loads of furniture donated or sold at cost (not sure which) by companies that wanted to advertise through the show.

Not only that, most of us don't have a team of people helping us to do something in ONE day. This stuff takes time people! Especially if you have a job...kids...you know any real life thing happening day to day. That will REALLY slow you down. That part of it really isn't the main point. You COULD have a bunch of girlfriends or family members help you out with a project to get it done faster, but don't fret if you can't completely give your home a face lift in 24-48 hours. That's just not normal.

I have been in apartments since college and am finally in my first house (who cares if it's a rental?). I'm determined to design, build, and redesign on pure thrift this time around. Can she do it? The occasional splurge is okay, but I thought if I'm going to be DIY-ing it, I might as well pass on the projects I try out. Especially since a good percentage of us are categorized under "novice" on most of these things. I'll make mistakes you will get to see along the way, but hopefully you will learn from my mistakes and maybe I can learn from YOUR ideas too!

Let's create some Style on the Cheap!