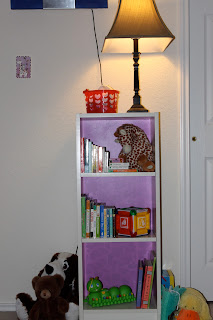
I had an inexpensive white IKEA BILLY Bookcase. Currently it costs $25 and is just a simple, short, 3 shelfer. Since I've put it in Dylan's room with her brown furniture I've been feeling like I needed to make it more a part of the flow of the room. It stands out so much I just had to do SOMETHING with it. Dylan has the Cocalo Jacana crib bedding set. So I decided to take the purple color out of it and stencil something on the backing of the bookshelf.
Cocalo Jacana
So I want to make sure I could remove the nails from the backing and slide it out of the bookshelf BEFORE I went and bought everything. Then, I went to the local craft store and picked up a small giraffe print stencil and purchased some Valspar paint from Lowes for a few bucks. The stencil was $3. They had a larger option with Zebra print for about $12, but I really wanted the giraffe print. So I took it home and tried to stencil using a rag for the paint and painter's tape to hold it in place. I didn't want to spend extra money on the stencil adhesive or a new brush. Well, the paint bled under the stencil without the adhesive and I didn't like the way the paint looked with the rag. Lucky for me the plastic bumpy texture of the backing allowed me to rub the dry paint right off with the rag. The unfortunate thing was I now realized if something (like a book) rubbed the backing the paint would come off. The answer? Primer, another $3 or so.
So, now realizing just how important the spray adhesive was, I hauled myself and Dylan back to the craft store and purchased it for another $3 or so. Luckily I found a flat stencil brush I didn't even know I had up with my craft stuff so that saved me money. Other options you can use are a roller or sponge. Hopefully you have one of those things on hand.
After using a spray primer and letting it dry, I then sprayed the stencil with the adhesive and it worked SO well and the paint didn't bleed underneath again at all. I also switched the stencil upside down back and forth so that it didn't look too uniform (a tip I had received from a Lowes YouTube video). I loved the way the giraffe print looked, what I didn't love was that the spots on the edges had flat sides so what I ended up with were two vertical lines down the middle of the backing:

I even tried using the stencil to put random spots within those vertical lines to distract from them, but I still couldn't get over how ridiculous I thought it looked. ARG! Painting over it was the only thing I could think of. I really wanted the print, but I thought solid purple would look better than plain white any day, so as disappointed as I was, that was what I decided to do.
Common sense: If you paint another layer of the same color on top of each other it will get darker. Instead of re-primering, I was lazy and decided to just paint a layer over it. Ultimately it made the white slightly purple and the spots that were already there REALLY purple. I don't endorse laziness on DIY projects NORMALLY, but to my surprise, it paid off. It ended up giving it kind of a cool dimensional look:
I know now that you know those vertical lines are there, you still see them. Better though, right? I figured once I put it in the bookshelf you really wouldn't notice with this new look that I now thought was pretty cool lookin'! So my last step was to apply a clear matte finish to protect the paint from scratching off with a book or toy. That was something I already had so I went ahead and used it and let everything dry over night before putting it back together:
See...you can't even tell the lines were there now and I have a gorgeous new look on my bookcase. YAY!
This wasn't that expensive of a project. I had actually purchased the paint and primer for another project we are doing so I already technically had that on hand. Here is the break down:
Stencil: $3
Adhesive: $3
So for $6 I practically had a completely new bookshelf.


Fun! I want to see if there is some way to add a backing to some shelves on the ikea bookshelves that are open. I am going to put fabric bins in some slots, but for the ones that didn't have that I thought it might give it a nice pop of color. Anyways, let me know if you think of a cool way to do that on the cheap :)
ReplyDeleteIf you mean for the shelves that don't come with a backing at all, I would say cut a big piece of particle board, cardboard, foam, or thick poster board and you can use a glue that wont bleed or a spray glue and attach either fabric or scrapbook paper, even wall paper if you have scraps. Paint is an option too. You use small nails to nail into the back or screws and a drill bit and drill it in. Not too hard, it will just take a little bit of work, but that would be "On The Cheap!" You can have the particle board cut at the hardware store before you get home if you don't have a saw.
Delete